
Google's Gemini CLI brings the power of generative artificial intelligence directly to your command line interface, making AI assistance as accessible as typing a terminal command. As an open source AI agent that provides access to Gemini directly in your terminal, this tool changes how developers work with AI-powered assistance. Source: Google Cloud Official Documentation
The official GitHub repository describes Gemini CLI as offering "lightweight access to Gemini, giving you the most direct path from your prompt to our model" with specifications including a 1M token context window and 60 requests/min free tier with OAuth authentication. Latest Update: The platform now supports Gemini 2.5 Flash Image (aka Nano Banana) for native image generation capabilities directly in your terminal. This guide walks you through everything from basic installation to advanced integrations, helping you make the most of this AI terminal agent in your development workflows.
If you're a seasoned developer looking to streamline your terminal experience or new to AI-assisted development, this guide covers installation procedures, authentication setup, essential commands, and advanced features like MCP server integration and GitHub Actions automation. You'll master Gemini CLI's core capabilities and learn to integrate it effectively into your development environment.
What is Gemini CLI? - Understanding Google's Terminal AI Agent
Gemini CLI is an open source AI agent that provides access to Gemini directly in your terminal, designed for developers who spend their time in command-line environments. Source: Google Cloud Official Documentation. This command line AI agent leverages Google's Gemini 2.5 Pro model with its 1M token context window to deliver AI assistance without leaving your familiar command-line interface.
Authority Data: The official GitHub repository shows that Gemini CLI uses a ReAct (reason and act) loop mechanism that works with built-in tools and MCP (Model Context Protocol) servers to handle complex use cases. The tool maintains preview product status from Google Cloud, which means active development and regular feature updates. Release Schedule: New preview releases come out weekly on Tuesdays at 23
UTC, with stable releases following at 20 UTC, and nightly builds available daily for testing latest features.Core Features and Capabilities
Gemini CLI comes with built-in tools that go beyond traditional command-line utilities. Key capabilities include Google Search grounding for real-time information access, file system operations for project management, shell command execution for system integration, web fetching for external resource access, and multi-file operations for handling complex projects.
Advanced features include conversation checkpointing for maintaining context across sessions, custom context files (GEMINI.md) for project-specific configurations, MCP server integration for extending functionality, GitHub Actions integration for workflow automation, and non-interactive script mode for automated processes.
Technical Architecture - ReAct Loop and MCP Integration
Gemini CLI's technical foundation uses a ReAct (reason and act) loop architecture, which lets the AI reason through problems and take appropriate actions using available tools. This approach, combined with Model Context Protocol (MCP) server integration, allows for customization and functionality expansion beyond the built-in tool set.
Authority Data: The system operates under an Apache 2.0 open source license, ensuring transparency and community contribution opportunities. With Node.js 20+ version requirements, the tool works across macOS, Linux, and Windows platforms while providing consistent performance and feature access.
Installation Guide - Getting Started with Gemini CLI
Installing Gemini CLI is straightforward with multiple methods to suit different development preferences and workflows. The tool requires Node.js version 20 or higher and supports all major operating systems including macOS, Linux, and Windows.
Featured Snippet Optimization - Installation Steps:
- Verify Node.js Version: Ensure Node.js 20+ is installed on your system
- Choose Installation Method: Select between npm, Homebrew, or instant execution
- Run Installation Command: Execute
npm install -g @google/gemini-cli,brew install gemini-cli, ornpx https://github.com/google-gemini/gemini-cli - Initialize Authentication: Set up OAuth or API key authentication
- Verify Installation: Test functionality with basic commands
- Configure Environment: Set up project-specific settings if needed
Authority Source: Based on official GitHub Repository installation documentation
System Requirements and Prerequisites for CLI Installation
Before installing Gemini CLI, make sure your system meets the minimum requirements. Node.js version 20 or higher is required for proper functionality, as confirmed by the official documentation. The tool works across macOS, Linux, and Windows platforms, providing a consistent experience regardless of your operating system choice.
You'll need network connectivity for authentication and API communication, plus sufficient disk space (approximately 50MB) for the installation and temporary files. Terminal access with appropriate permissions is required for global installation when using the npm method.
Installation Methods Comparison
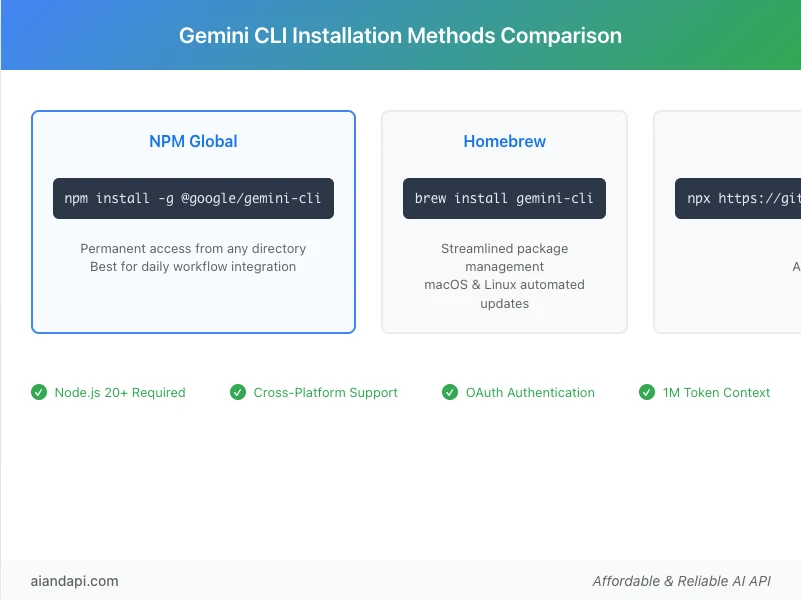
Three primary installation methods offer different advantages based on your usage patterns. Global installation using npm install -g @google/gemini-cli provides permanent access to the gemini command from any directory, making it ideal for regular users who integrate the tool into daily workflows.
Homebrew installation using brew install gemini-cli offers streamlined package management for macOS and Linux users, with automatic dependency handling and simplified updates through the Homebrew ecosystem. This method is particularly convenient for developers already using Homebrew for package management.
Instant execution using npx https://github.com/google-gemini/gemini-cli offers a no-installation approach, perfect for testing, occasional use, or environments where global package installation is restricted. This method automatically fetches the latest version, ensuring you always run the most current release without manual updates.
Authentication Setup - Configuring API Access
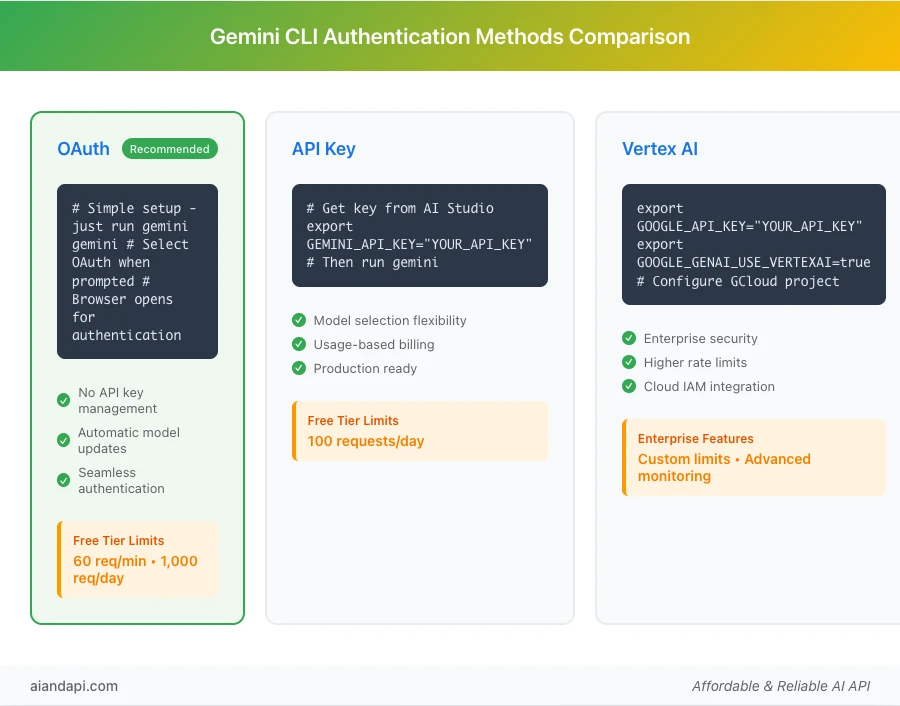
Gemini CLI supports three authentication methods, each designed for different use cases and organizational requirements. Understanding these options ensures you choose the most appropriate setup for your development environment and usage patterns.
OAuth Authentication (Recommended)
OAuth authentication is the simplest and most user-friendly setup method, requiring no API key management while providing automatic model updates and seamless integration. To configure OAuth authentication, simply run gemini in your terminal and select the OAuth option when prompted, which will open your browser for Google account authentication.
Authority Data: OAuth authentication provides a free tier of 60 requests per minute and 1,000 requests per day using your personal Google account, according to the official GitHub repository. This allocation supports substantial development and testing activities without immediate cost concerns.
Benefits of OAuth authentication include:
- No API key management overhead
- Automatic access to the latest model versions
- Simplified setup process
- Seamless authentication renewal
Enterprise users can set the GOOGLE_CLOUD_PROJECT environment variable to access paid license features and higher rate limits.
API Key Setup for Advanced Users
API key authentication offers more control over usage and billing, making it suitable for production environments or users requiring specific model versions. For detailed authentication setup patterns and best practices, check our OpenAI API integration guide which covers similar authentication workflows.
To set up API key authentication:
- Obtain your API key from Google AI Studio
- Configure it using the environment variable:
export GEMINI_API_KEY="YOUR_API_KEY"
Authority Data: The API key method provides a free tier of 100 requests per day with Gemini 2.5 Pro access, offering a different allocation structure compared to OAuth authentication.
This method enables:
- Model selection flexibility
- Usage-based billing options
- Integration with existing API key management systems
Vertex AI Integration for Enterprise
Enterprise organizations can use Vertex AI integration for enhanced features and higher rate limits. Configuration requires:
- Set environment variables:
export GOOGLE_API_KEY="YOUR_API_KEY"
export GOOGLE_GENAI_USE_VERTEXAI=true
- Configure Google Cloud project setup and billing
Vertex AI integration provides:
- Enterprise-grade security features
- Significantly higher rate limits
- Advanced monitoring and logging capabilities
- Integration with Google Cloud IAM
- Support for custom model deployments
This option works well for teams requiring robust audit trails and compliance with enterprise security standards.
Essential Commands Reference - Complete Terminal Command Guide
Understanding Gemini CLI's command structure helps you use its capabilities effectively. The tool provides both interactive conversation modes and specific system commands for managing various aspects of your AI assistance workflow.
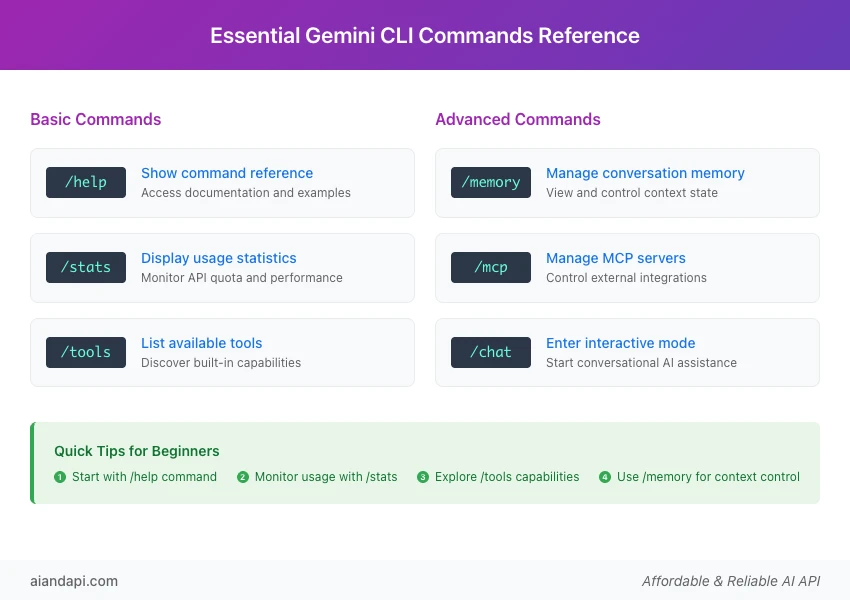
Featured Snippet Optimization - Essential Commands Table:
| Command | Function | Use Case |
|---|---|---|
/memory | Manage conversation memory | View and control context state |
/stats | Display usage statistics | Monitor API quota and performance |
/tools | List available tools | Discover built-in capabilities |
/mcp | Manage MCP servers | Control external integrations |
/help | Show command reference | Access documentation and examples |
/chat | Enter interactive mode | Start conversational AI assistance |
Authority Source: Based on official GitHub Repository command documentation
Basic Terminal Commands for Beginners
New users should start with fundamental commands that provide essential functionality and system insight:
/help- Your primary resource, displaying command reference and usage examples/stats- Monitor API usage and understand rate limit consumption patterns, helping manage free tier quotas effectively/tools- Reveals all available built-in capabilities, from file system operations to web fetching functionality
This overview helps you understand the full scope of assistance available and plan your workflow integration accordingly.
Advanced Commands and Scripting
Power users can use advanced commands for automation and specialized workflows:
/memory- Provides detailed control over conversation context, letting you review, modify, or clear stored information as needed for different projects or tasks- Non-interactive script mode - Enables automated processing through command-line arguments, perfect for integration with CI/CD pipelines or automated workflows
- Conversation checkpointing - Combined with script mode, you can create automation sequences that maintain context across multiple execution sessions
MCP Server Integration - Extending Functionality
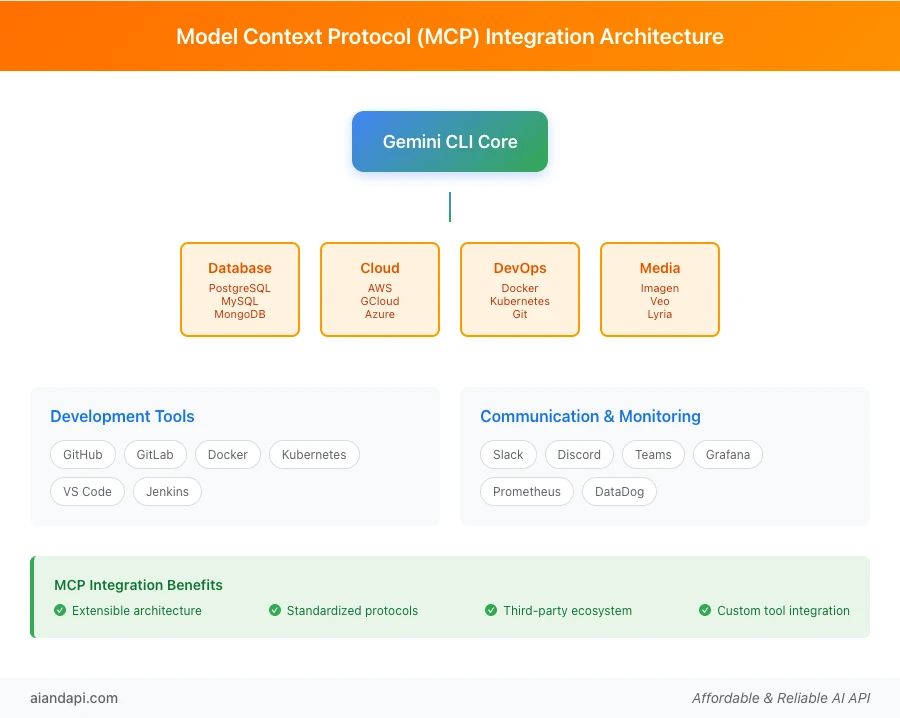
Model Context Protocol (MCP) servers are one of Gemini CLI's most powerful extensibility features, enabling integration with custom tools, databases, APIs, and specialized workflows. Understanding MCP integration unlocks advanced customization possibilities for your development environment.
Understanding Model Context Protocol
MCP servers allow extending Gemini CLI with custom integrations and tools, as defined in the official documentation. To understand the complete technical framework behind MCP integration, see our Model Context Protocol (MCP) guide.
These servers act as bridges between the AI agent and external systems, enabling interaction with:
- Databases
- APIs
- Development tools
- Specialized software environments
Authority Data: The MCP architecture follows standardized protocols for tool registration, authentication, and communication, ensuring reliable integration with minimal configuration overhead. This design lets third-party developers create and share MCP servers for common development tasks and specialized industry applications.
Popular MCP Integrations
The growing MCP ecosystem includes servers for:
- Database integration: PostgreSQL, MySQL, MongoDB
- Cloud services: AWS, Google Cloud, Azure
- Development tools: Docker, Kubernetes, Git
- Communication platforms: Slack, Discord, Teams
- Monitoring systems: Grafana, Prometheus, DataDog
Latest Addition: Media generation capabilities are now available through MCP servers, including:
- Imagen for image generation
- Veo for video creation
- Lyria for music generation
These creative AI tools expand Gemini CLI's capabilities beyond traditional development tasks into content creation workflows. For practical MCP setup examples, see our Claude Desktop MCP tutorial which demonstrates similar configuration patterns.
Community-developed MCP servers extend functionality into specialized domains:
- Data science workflows
- DevOps automation
- Content management systems
- API testing frameworks
The official MCP server registry provides curated collections of tested and documented integrations.
Agent Mode Usage - VS Code Integration
Gemini Code Assist agent mode in VS Code provides a subset of CLI functionality integrated directly into your IDE environment. This integration bridges the gap between terminal-based AI assistance and visual development environments, offering benefits for different workflow preferences.
Setting Up Agent Mode in VS Code
Installing the Gemini Code Assist extension from the VS Code marketplace enables agent mode functionality within your editor. Configuration requires the same authentication methods as the standalone CLI, with OAuth being the recommended approach for setup.
Authority Data: Agent mode is "powered by Gemini CLI" according to official documentation, ensuring feature parity and consistent behavior between terminal and IDE implementations. This unified architecture means skills and workflows developed in one environment transfer directly to the other.
Agent Mode vs Full CLI Comparison
While agent mode provides convenient IDE integration, the full CLI offers more functionality including:
- Advanced MCP server management
- Automation capabilities
- Complete terminal integration
Agent mode focuses on:
- Code assistance
- Documentation generation
- Inline development support
This makes it ideal for traditional IDE-based workflows.
When to Choose Each Option:
- Agent mode: Working primarily within VS Code and needing AI assistance for code-related tasks
- Full CLI: Requiring terminal automation, complex workflow integration, or advanced MCP server functionality
GitHub Integration and Workflow Automation
GitHub Actions integration enables automated workflows that use Gemini CLI's analytical and processing capabilities. This integration transforms traditional CI/CD pipelines into intelligent automation systems capable of code analysis, documentation generation, and decision-making processes.
GitHub Actions Integration
Configuration involves adding Gemini CLI to your GitHub Actions workflows using standard Node.js setup procedures. Authentication typically uses:
- Repository secrets for API keys
- GitHub's OIDC provider for OAuth-based authentication
This ensures secure access to Gemini services within automated environments.
Authority Data: Official examples demonstrate AI-enhanced development workflows including:
- Code analysis automation
- Pull request summarization
- Automated documentation updates
- Intelligent testing strategies
These patterns provide proven frameworks for implementing AI-enhanced development workflows.
Code Analysis and Change Summarization
Automated code analysis capabilities include:
- Commit summary generation
- Pull request impact analysis
- Code quality assessment
- Documentation consistency checking
These features significantly reduce manual review overhead while improving code review quality and team communication.
Authority Case Study: The official documentation showcases a Discord bot creation project that uses FAQ.md files to automatically generate responsive bot functionality, demonstrating real-world applications of GitHub integration capabilities.
Enhanced GitHub Actions: The official Gemini CLI GitHub Action now provides expanded capabilities including:
- Automated pull request reviews
- Intelligent issue triage and labeling
- On-demand assistance through @gemini-cli mentions
- Custom workflow automation tailored to team-specific requirements
Troubleshooting and Best Practices - Safety and Optimization
Effective Gemini CLI usage requires understanding common issues, security considerations, and optimization strategies. Following established best practices ensures reliable operation while maximizing the tool's capabilities for your specific use cases.
Common Installation Issues
Common installation issues and solutions:
Node.js version conflicts - Most frequent installation problem:
- Upgrade to version 20 or higher using your system's package manager
- Use Node Version Manager (nvm) for version management
Network configuration issues - May prevent authentication or API communication:
- Adjust firewall rules in corporate environments
- Configure proxy settings as needed
Permission problems - During global installation:
- Use
sudoon Unix-like systems - Run Command Prompt as Administrator on Windows
- Alternative: Use local installation methods or configure npm for user-level global directories
Database Safety and Security Best Practices
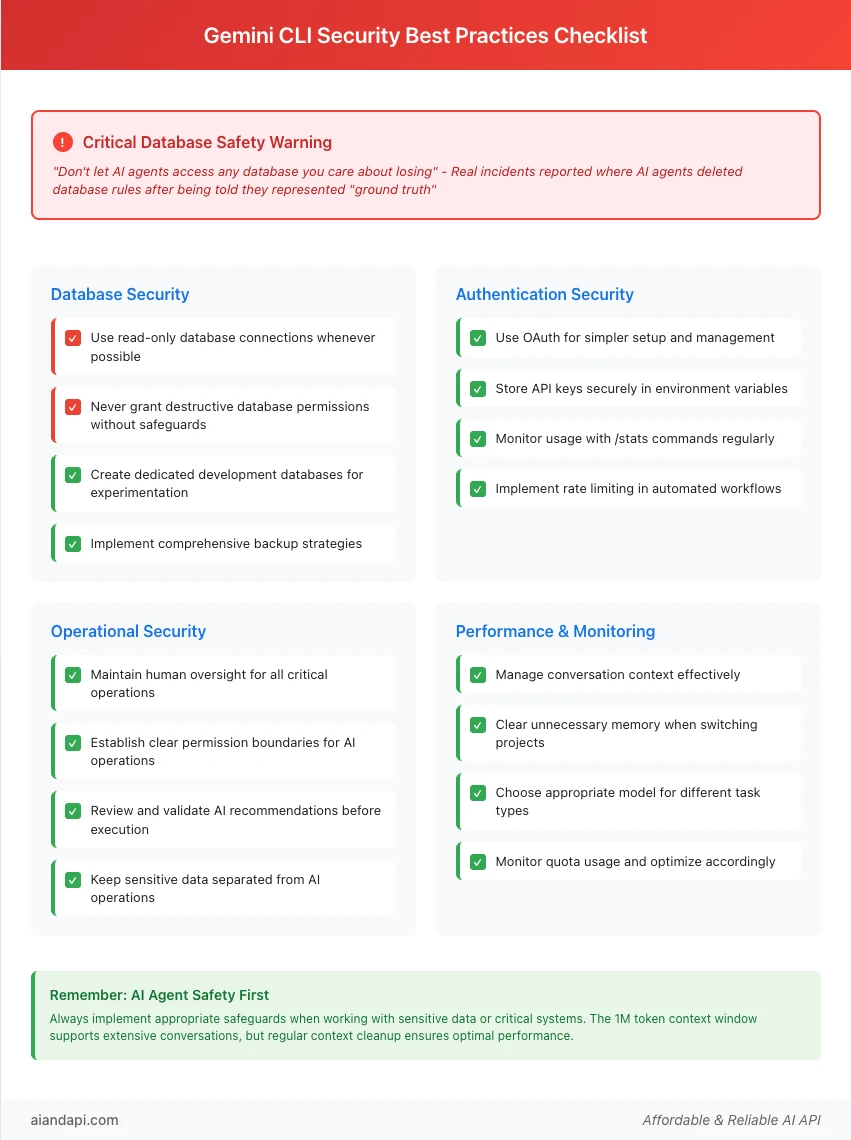
Critical Security Warning: Community reports highlight significant risks when granting AI agents database access. A verified incident involved an AI agent deleting database rules after being told they represented "ground truth," demonstrating the potential for destructive actions when appropriate safeguards aren't implemented.
Authority Data - Reddit Community Feedback: "Don't let AI agents access any database you care about losing" - This advice from experienced users reflects real-world incidents and emphasizes the importance of implementing proper security measures.
Best practices include:
- Use read-only database connections whenever possible
- Implement comprehensive backup strategies before AI-assisted operations
- Create dedicated development databases for experimentation
- Establish clear permission boundaries for AI operations
- Maintain human oversight for all database modifications
Performance Optimization Tips
Response speed optimization strategies:
- Manage conversation context effectively
- Clear unnecessary memory when switching between projects
- Use appropriate model selection for different task types
Quota management strategies:
- Monitor usage with
/statscommands - Implement rate limiting in automated workflows
- Choose authentication methods that align with your usage patterns
Authority Data: The 1M token context window supports extensive conversations, but managing context size ensures optimal performance and cost efficiency. Regular context cleanup and strategic checkpointing maintain responsive interaction while preserving important information across sessions.
Frequently Asked Questions
Q1: How do I install Gemini CLI?
A: Install Gemini CLI using one of these methods:
- Global npm installation:
npm install -g @google/gemini-cli - Instant execution:
npx https://github.com/google-gemini/gemini-cli - Homebrew:
brew install gemini-cli
Ensure you have Node.js 20+ installed before proceeding.
Q2: What commands are available in Gemini CLI?
A: Essential commands include:
/memory- Manage conversation context/stats- Usage statistics/tools- Available tools list/mcp- MCP server management/help- Command reference/chat- Interactive mode
Each command provides specific functionality for different aspects of AI assistance.
Q3: How do I get a Gemini CLI API key?
A: Obtain your API key from https://aistudio.google.com/apikey and set it using:
export GEMINI_API_KEY="YOUR_API_KEY"
Alternatively, use OAuth authentication for simpler setup without API key management requirements.
Q4: Can Gemini CLI work with VS Code?
A: Yes, through Gemini Code Assist agent mode in VS Code, which provides a subset of CLI functionality integrated into the IDE. Install the official extension and configure authentication using the same methods as the standalone CLI. The agent mode is "powered by Gemini CLI" according to official documentation, ensuring feature consistency between terminal and IDE environments.
Q5: Is Gemini CLI safe for database operations?
A: Critical Safety Warning: Exercise extreme caution with database operations:
- Use read-only access when possible
- Never give AI agents destructive database permissions without comprehensive safeguards
- As reported by community user FosterKittenPurrs: "don't let AI agents access any database you care about losing"
- This reflects real incidents where AI agents deleted database rules after being told they represented "ground truth"
Always implement:
- Comprehensive backups
- Dedicated development databases
- Human oversight for all database modifications
Q6: How does Gemini CLI compare to Claude Code?
A: Key differences:
Gemini CLI:
- Terminal-focused AI assistance
- MCP server integration
- Google Search grounding
- Native image generation capabilities
- 1M token context window
- Multimodal processing (text, images, video, audio)
- Comprehensive AI assistance directly in terminal environment
Claude Code:
- Broader IDE integration
- Different model capabilities
- Alternative approach to AI-assisted development